Overview
Habit2 has a user-friendly GUI that allows a user to configure a wide variety of infant looking-time experiments, save the settings, and share those settings between computers or researchers. Habit2 allows for flexible configuration of an unlimited number of experimental phases, how individual looks are defined, how trials are times, what kind of stimuli are presented, how many stimulus presentation monitors are used, and so on. Once a user has configured settings for a particular experiment or procedure, those settings are saved locally and can be exchanged between computers. Thus, this information could be stored with other experimental materials in a repository such as the Open Science Foundation to support replication efforts.
In addition, existing experimental settings can be used as a template for developing new procedures. Users can make copies of existing experiments and edit those copies to quickly to easily construct variations of an experimental configuration. Habit2 comes preloaded with several templates that can be modified to meet the needs of a particular study. Some preferences, like assigning stimuli to a specific monitor or defining a networked drive path to a shared stimuli folder, can be customized on a per-machine basis to allow labs to use Habit2 experiments in different testing rooms with different monitor configurations.
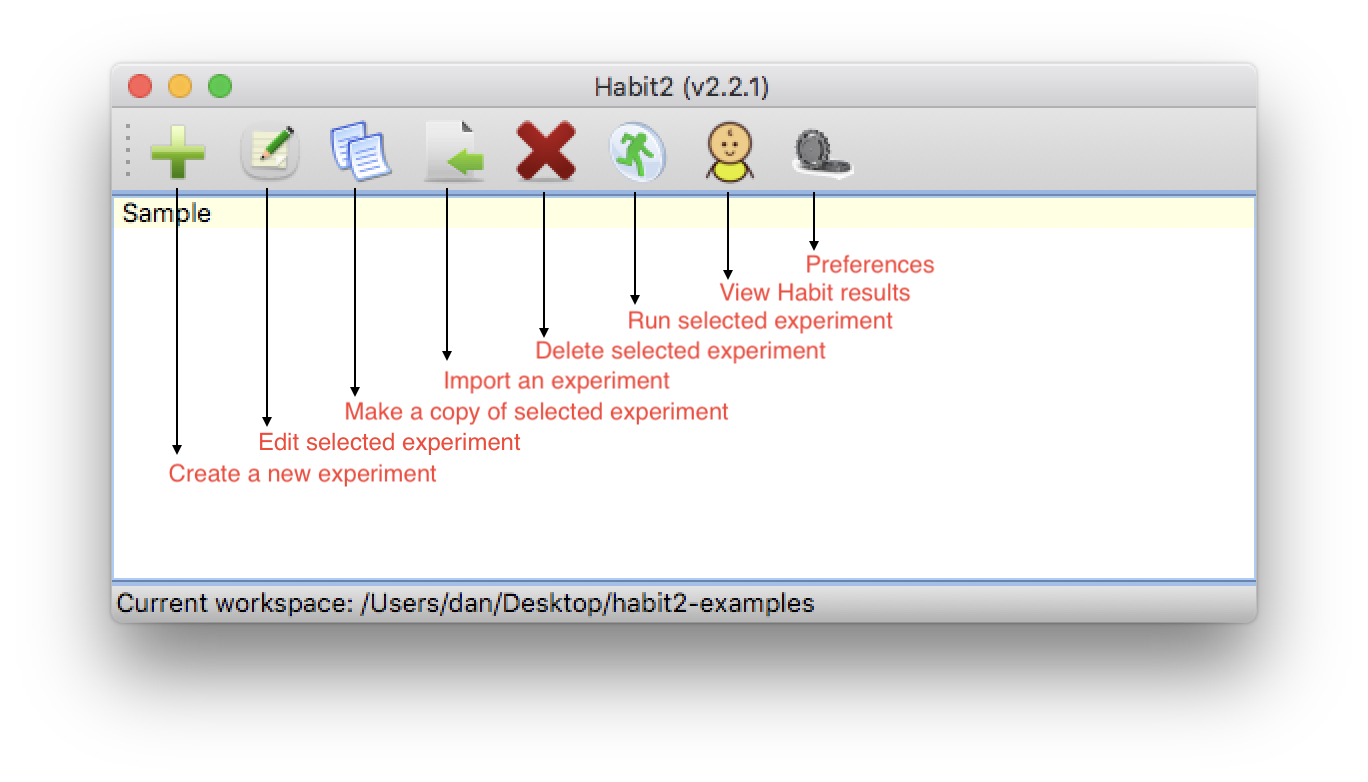
Figure 1: The main Habit2 dialog. Experiments in the current workspace are displayed on a background color which indicates whether their settings are complete (and the experiment can be run).
The Habit2 Workspace
Each time you are running Habit2, either to design and define experiments, or to run those experiments on subjects, you are working in what we call a workspace. In Habit2, a workspace is simply a folder on your system where settings and experimental results are stored. You can (but are not required to) also store stimuli within the workspace.
In any newly-created workspace folder you will find the following:
- a database file named habit22.sqlite. This file should not be edited or modified directly. Habit2 uses this database to save experimental settings. Do not move this file - it must be found in the workspace folder.
- a folder named results. As its name suggests, Habit2 stores the results of each experimental run in this folder.
- a folder named stim. You can store stimuli here for experiments defined in this workspace (make sure “Use default stimulus root dir” is checked in your Preferences). Newly-created workspaces will have a folder named examples linked here, and the stimuli it contains are used in the template experiments. The examples folder is shared across all workspaces.
- a folder named log. Habit2 stores log files from each time it is run in this folder. The log files aren’t of much use to the user, but may be useful in the event of a crash or other unexpected event in Habit2.
- a folder named misc. This folder contains sample text files for importing stimuli, and is a read-only folder shared across all workspaces.
(Note - workspace folders created with previous versions of Habit will not have the examples folder within the stim folder, and will not have the misc folder, either.)
Multiple workspaces may be created on a machine, allowing experimenters to keep groups of related experiments together in a single workspace, while allowing for a separation between unrelated groups of experiments. An entire workspace folder may be copied between machines, or a networked workspace folder may be shared by different users (though the users cannot access the same Habit2 workspace at the same time). Users may switch between different workspaces in a Habit2 session using the
A workspace can be copied to another computer running Habit2 and used there. You can design experiments on one machine, then move the workspace to another machine to collect data. A lab that runs different classes of experiments can maintain separate workspaces for each type of experiment. Experimenters who share a common computer for data collection can easily segregate their settings and stimuli from one another.
It is important to back up your workspace! Make sure your workspace folder is included in your regular backup schedule.
The current workspace folder is always displayed in the status bar at the bottom of the main Habit2 dialog. In the example below I am using a workspace named new3, which I’ve located on my Desktop.
Default workspace
When Habit2 is first run on a machine, a workspace, called habit is automatically created in your Documents folder.
Creating a new workspace
Switching to a different workspace is done via the Preferences settings. When you click Select, a chooser dialog opens and you may select an existing workspace folder, or you may create a new folder. If a new folder is created and selected, then Habit2 will create a new workspace in that folder, and your current Habit2 session will begin using the new workspace immediately.
The Stimulus Root Folder
When Habit runs an experiment it must be able to locate all stimulus files. The Stimulus Root Folder setting can be used to reference stimili file names relative to a common location. When you specify a stimulus file that is beneath the stimulus root folder in your filesystem, Habit will store only the portion of the file’s path that is beneath the root folder.
What good is that? The stimulus root is especially important if you develop experiments on one computer, but you run the experiments on a different computer. The Stimulus Root Folder can be set to a unique values on different computers. You may store your stimuli in a common network share, under a common root folder. On each computer from which Habit must access those stimuli files, you can configure the Stimulus Root Folder to be the unique network path to that shared stimulus folder.
You may simply want to segregate the stimuli for different experiments, so for the experiments in one workspace you may use one common folder containing stimuli, but for another workspace you use an entirely different set of stimuli.
Default Stimulus Root Folder
Each workspace has a folder named stim, which can be chosen as the stimulus root. If you choose this folder as your stimulus root, then your entire workspace will be self-contained, and you can move the entire folder structure between machines, or access the folder from different network locations. When using the workspace, make sure your Preferences have the default stimulus root selected.
Local Preferences
Habit2 also maintains local preferences, which are settings that may vary depending on the specific monitor and file system configurations on a given machine. Clicking the Preferences icon (above) in Habit’s main dialog opens the Workspace Preferences dialog (see Figure 2).

Figure 2: The Workspace Preferences dialog.
- Workspace
- Select the workspace you want to use here. To create a new workspace, click Choose and navigate to a new folder. To switch to an existing workspace, navigate to an existing workspace folder.
- Stimulus Root
- Navigate to the stimulus root folder, or click the Default button to specify that the stim folder inside your workspace should be used as the root. You must click *Save* after changing the stimulus root. Each workspace on your machine can have a different value for the stimulus root folder.
- Monitor Assignments
Specify the monitor(s) to use for presenting stimuli. The control monitor is the monitor which the experimenter will see during the experiment. The Identify Monitors button will display a dialog on each connected screen, showing the correct identifier to use when assigning that monitor to one of the display roles. Note that the stimuli screens are labelled Center, Left, and Right within Habit, and the stimuli files are configured using those same labels, but those names are arbitrary - Habit has no way of knowing the locations of your screens relative to one another.
When you run an experiment, however, your keypresses that indicate looking indicate that looking is directed to a specific monitor (by default, keypress 4, 5, 6 correspond to looking towards the Left, Center, and Right screens, respectively. At the Infant Cognition Lab, we specify the screen orientation as seen by the experimenter, not the subject. That’s because the experimenter observes the infant from a viewpoint behind the stimulus screens. When the infant looks at the screen on their left, they are looking to the right from the viewpoint of the experimenter. Its more natural for the experimenter to indicate that the subject is looking to the right, in this case, because they are seeing looking to their right.